This guide shows you how to install and set up the Ngine Joomla template.
Current release: Ngine 6.2.0, released 6 November 2026. Built for Joomla 6 (6.1 or later). PHP 8.3 or later. Quickstart: Joomla 6.2.0. What changed in each release.
Table of Contents
- What Ngine Is For
- What You Need
- What You Get
- Which Should I Install, The Quickstart Or The Template
- Installing The Quickstart
- Installing Just The Template On An Existing Site
- What To Do First
- How Do I Open The Template Settings
- How Do I Add My Logo And Slogan
- How Do I Change The Colours
- How Do I Set Up The Favicon
- Template Module Positions
- How Do I Set Up The Main Menu
- How Do I Set Up The Slideshow
- How Do I Add My Own Text And Banners
- How Do I Change How A Module Looks
- How Do I Set Up The Login And Register Buttons
- How Do I Set Up The Search Box
- How Do I Set Up The Social Icons
- How Do I Set Up The Footer
- How Does It Work On Phones
- How Do I Add My Own CSS Or Analytics Code
- How Do I Keep It Up To Date
- Where To Get Help
What Ngine Is For
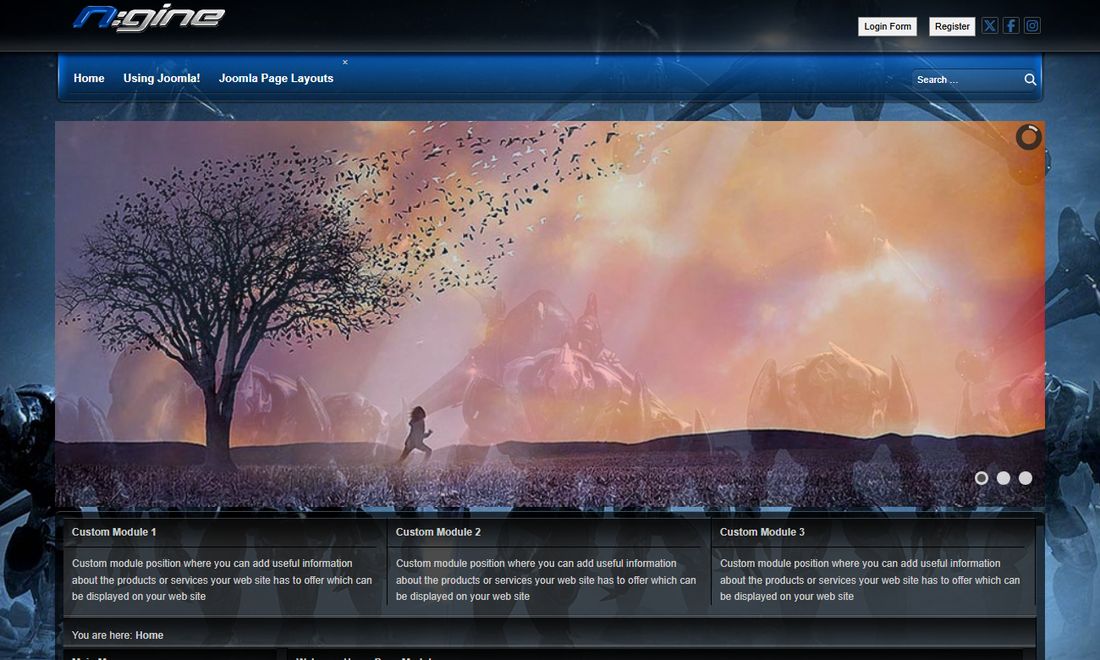
Ngine is a dark Joomla 6 template with a cinematic look. It suits game clans, fan sites, and film and entertainment sites. The art behind the page gives it its look.
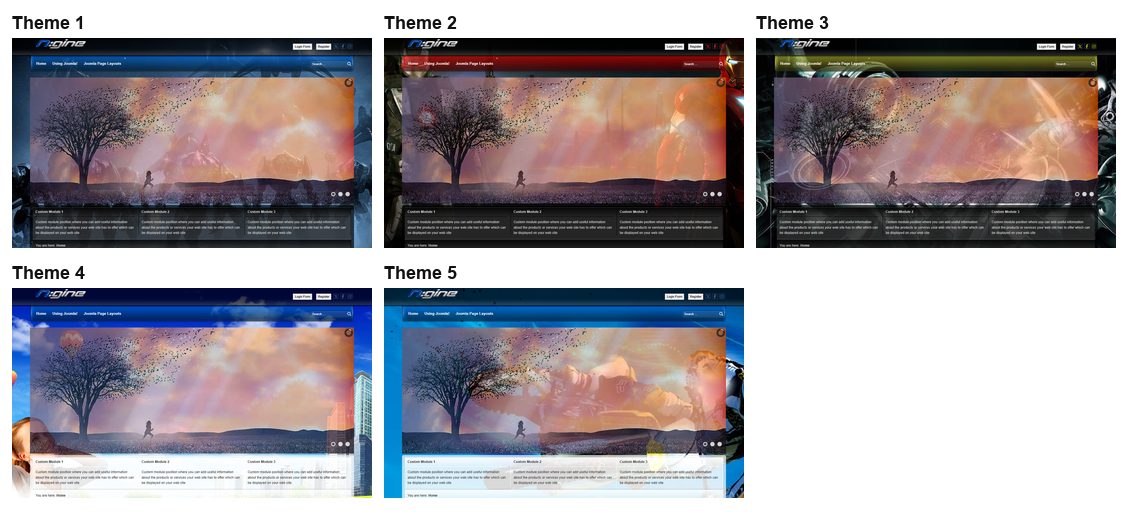
- Five built-in colour themes, each with its own background art
- 46 module positions
- A built-in slideshow
- A login window that opens over the page
- Links to 13 social networks
- Its own phone layout
It does not include a shop. For an online store, look at the shop templates.
What You Need
- Joomla 6 (6.1 or later). The Quickstart includes Joomla 6.2.0.
- PHP 8.3 or later.
- Web hosting and a database that meet Joomla's technical requirements.
- No other extensions. The template does not need a page builder or a shop component.
Want to see it first? The Ngine demo runs this same release.
What You Get
After you buy Ngine, its files are in My Downloads. Open the ngine folder.
- Joomla5 / quickstart / ngine-quickstart-J6.2.0.zip: a complete Joomla 6.2.0 site with the template and the demo content.
- Joomla5 / Template Files / pkg_ngine-6.2.0.zip: the template on its own, for a site you already have.
- Photoshop Files: psd.zip holds the design file (n-gine.psd), and backgrounds.zip holds five background images.
- Joomla3: the old version of the template for Joomla 3. You do not need it for a new site.
The folder is called Joomla5, but the files inside it are the Joomla 6 release. The name on the zip file is the one to go by. Each of the two folders also has a short readme.txt.
Which Should I Install, The Quickstart Or The Template
Starting a new site? Use the Quickstart. Your site starts out looking like the demo, and you replace the content with your own. This is the easiest way to learn how Ngine is put together.
Adding Ngine to a site you already have? Install only the template. Your articles and menus stay as they are, and you set up the modules yourself using this guide.
Never install the Quickstart over a site you already have. It is a whole new Joomla site and it would replace your content.
Installing The Quickstart
- In your hosting control panel, create an empty database and a database user, and note the details.
- Upload ngine-quickstart-J6.2.0.zip to your hosting account and extract it where you want the site. Use a sub-folder to try it out, or the main web folder for a real site.
- Visit
https://your-site/installation/index.phpand follow the normal Joomla installer. You enter your database details and create your own administrator account. No shared password comes with the package. - When the installer finishes, the
installationfolder is removed and your Ngine site is ready.
The Quickstart guide goes through these steps in more detail.
Installing Just The Template On An Existing Site
- Log in to your Joomla administrator area.
- Open System and, in the Install panel, select Extensions.
- On the Upload Package File tab, drag in pkg_ngine-6.2.0.zip or select Or browse for file and choose it. Joomla installs it as soon as the upload finishes.
- Open System and, in the Templates panel, select Site Template Styles.
- Tick the check box next to the Ngine style and select Default in the toolbar.
Using the package, rather than a bare template zip, also registers the template with Joomla's Update Manager. New releases then appear under System, in the Update panel, under Extensions.
Next, go to What To Do First. Your existing modules keep their old position names, so they will not show until you move them to Ngine positions.
What To Do First
- Pick a colour theme. A new install has Built-in Theme off, so turn it on and choose one (see the colours section). The demo uses Theme 1.
- Add your logo or type your site name.
- Set up the main menu in position-1.
- Replace the slides with your own pictures, or remove them.
- Replace the sample modules. On a Quickstart site, the home page modules hold placeholder text. Edit them, or unpublish the ones you do not need. Positions with nothing published close up.
- Change the footer text and your social links.
- Check it on your phone.
How Do I Open The Template Settings
- Open System and, in the Templates panel, select Site Template Styles.
- Select the name of your template style to open it.
The settings are on these tabs:
- Favicon: the small icon in the browser tab
- Basic: the text size
- Site Name & Slogan: your logo and slogan
- Community Links: the social icons
- Header & Footer Custom Code: your own CSS, and code for analytics
- Built-in Slideshow: how the slideshow behaves
- Theme: colour themes and your own colours
Ngine also has a Drop Down Menu tab. You can leave it alone: drop-downs work without it.
How Do I Add My Logo And Slogan
- Open System and, in the Templates panel, select Site Template Styles.
- Select the name of your template style to open it.
- Select the Site Name & Slogan tab.
- To use text, type your name in Site Name, then set Site Name Color and Site Name Font Size.
- To use a picture, set Site Name as Image to Yes and choose your logo in Built-in Site Name. Keep your name in Site Name too, because it becomes the logo's alt text. The demo logo is 182 by 36 pixels.
- Use Site Name Position X and Y to move it, and Top Handler Height to change the height of the area that holds it.
- The slogan has the same options further down the tab. The demo leaves it empty.
- Select Save & Close.
Site Name linkable makes the logo and slogan link to your home page. It is on by default.
How Do I Change The Colours
- Open System and, in the Templates panel, select Site Template Styles.
- Select the name of your template style to open it.
- Select the Theme tab.
- To use a ready-made look, set Built-in Theme to Yes and pick one in Choose Theme. Theme 1 is blue, Theme 2 is red and Theme 3 is green. Themes 4 and 5 have brighter art behind the page: Theme 4 is a city and Theme 5 is motorsport.
- To choose your own colours, set Built-in Theme to No. Click any colour field to open the colour picker. The 21 fields cover the page, menu, buttons, modules and footer. With a built-in theme on, these fields are ignored.
- Select Save & Close.
To change the text size, use Text Font Size on the Basic tab.
How Do I Set Up The Favicon
- Open System and, in the Templates panel, select Site Template Styles.
- Select the name of your template style to open it.
- Select the Favicon tab and choose an image.
- If it is not square, use the Favicon Crop Tool on the same tab to pick the part you want.
- Select Save. The template creates the icon sizes that visitors' devices need.
Template Module Positions
The picture shows where each position sits. Positions with nothing published in them close up, so the page never shows an empty box.
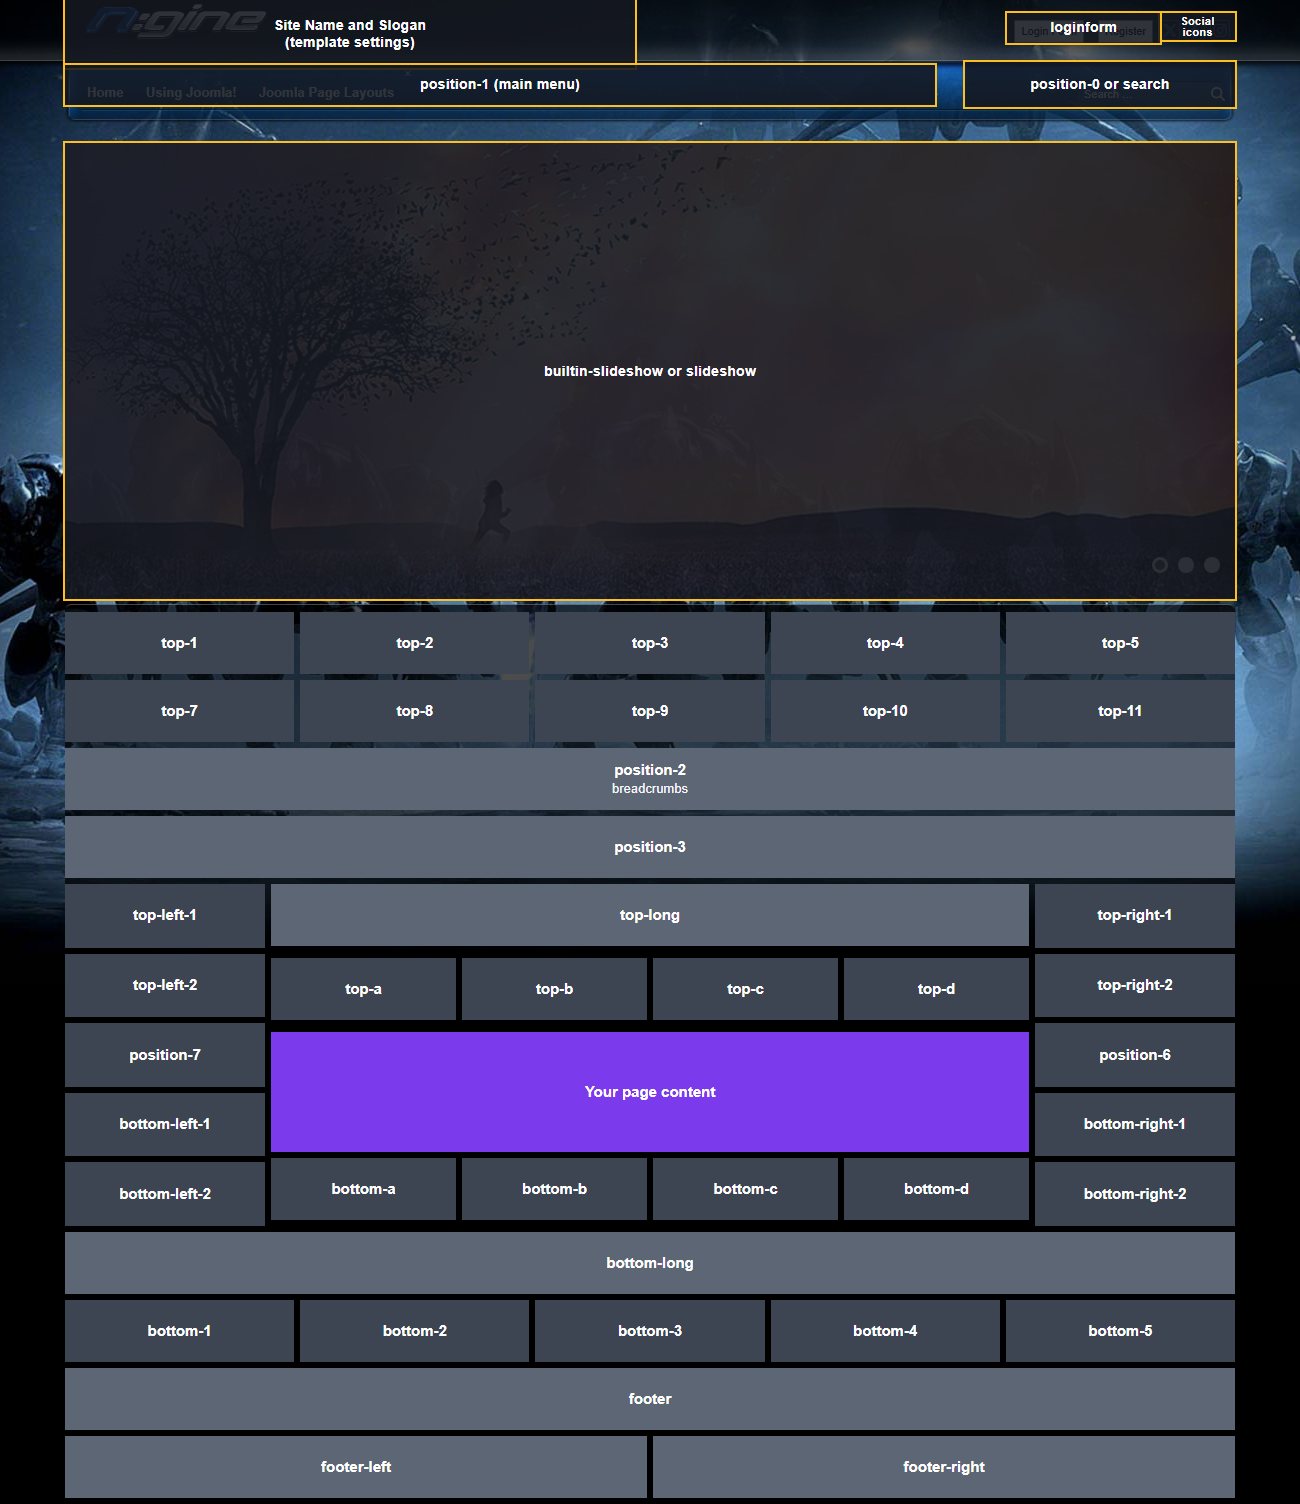
- Header: loginform (Login and Register buttons)
- Menu bar: position-1 (main menu), position-0 or search
- Under the menu: builtin-slideshow or slideshow
- Above the content: top-1 to top-5, top-7 to top-11, position-2 (breadcrumbs), position-3
- Left column: top-left-1, top-left-2, position-7, bottom-left-1, bottom-left-2
- Centre column: top-long, top-a to top-d, your page content, bottom-a to bottom-d
- Right column: top-right-1, top-right-2, position-6, bottom-right-1, bottom-right-2
- Below the content: bottom-long, bottom-1 to bottom-5
- Footer: footer, footer-left, footer-right
Each row shares its width equally between the positions you use, so publishing to top-1 and top-2 gives you two equal columns. The centre column widens when a side column is empty. Note that the rows skip top-6: they run top-1 to top-5, then top-7 to top-11.
How Do I Set Up The Main Menu
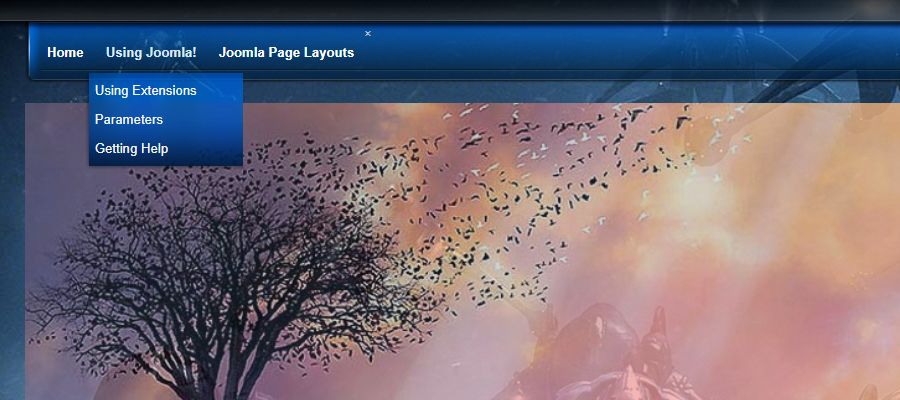
The main menu is a normal Joomla Menu module, with these settings:
- Open Content, select Site Modules, and open your menu module, or select New and then Menu.
- In Menu to Show, choose your menu.
- In Position, choose position-1.
- Set Sub-menu Items to Show so the drop-downs work.
- On the Advanced tab, set Menu Tag ID to
navand Menu Class to-nav, with the dash. - Select Save & Close.
To add a short line of text under a menu item, type it in that item's Note field in Menus.
How Do I Set Up The Slideshow

Each slide is a Custom module in the builtin-slideshow position. On a Quickstart site, open Slide 1, 2 and 3 and swap the pictures.
- Prepare a .jpg for each slide. The demo slides are 960 by 368 pixels, in the images/ngine/slideshow folder.
- Open Content, select Site Modules, select New, then Custom.
- Enter a title. It is for your reference and does not show on the slide.
- To show text over the picture, type it in the editor. The demo slides have no text, and an empty slide simply shows the picture.
- In Position, choose builtin-slideshow.
- On the Options tab, choose your picture in Select a Background Image.
- On the Menu Assignment tab, assign it to your home page, then save.
- Repeat for each slide. The module ordering sets the slide order.
To change how the text arrives, enter one of these in the slide's Module Class field on the Advanced tab: fadeFromLeft (used if you leave it empty), fadeFromRight, fadeFromTop, fadeFromBottom, fadeIn, moveFromLeft, moveFromRight, moveFromTop or moveFromBottom.
The Built-in Slideshow tab in the template settings controls the rest:
- Turn ON/OFF autoplaying and Slide Duration (ms): whether it plays by itself, and for how long each slide shows. The default is 7000, which is 7 seconds.
- Choose FX Effects and Animation Duration (ms): the change between slides.
- Height: a percentage of the slideshow's width, or pixels. The default is 39%.
- Navigation, Pagination and Turn ON/OFF thumbnails: the arrows, the dots and the small preview pictures.
- Specify the slide caption position and width: where the text sits.
Using a slideshow extension from another developer? Publish it to the slideshow position, unpublish your slide modules, and set Turn Slideshow ON/OFF to No. On a page where builtin-slideshow has a module, the slideshow position does not show.
How Do I Add My Own Text And Banners
The boxes on the demo home page are Custom modules. Create one like this:
- Open Content and select Site Modules.
- Select New, then Custom.
- Enter a title and add your text or image in the editor.
- In Position, choose the position you want, for example top-1 or bottom-long.
- On the Menu Assignment tab, choose the pages it should appear on. Use On all pages if it should show everywhere.
- Select Save & Close.
To add a button, add this in the editor's source view and change the # to your link:
<p><a class="button" href="#">Find Out More</a></p>How Do I Change How A Module Looks
Enter one of these in the module's Module Class field on the Advanced tab, with no space in front:
_style1and_style2: alternative box styles. The demo uses_style2for its home page modules._menu: for menus in the side columns._text: for plain text._empty: a plain module with no box.
On the Theme tab, you can set your own text and link colours for modules. Those fields work when Built-in Theme is off.
How Do I Set Up The Login And Register Buttons
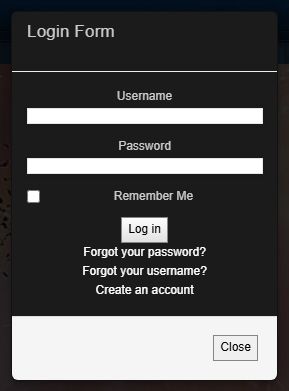
- Open Content, select Site Modules, and open your Login Form module, or create one.
- In Position, choose loginform, and save.
The module title becomes the wording on the button in the header. The demo says "Login Form", and you may prefer "Log in". The form opens in a window over the page. The Register button shows only when Allow User Registration is on in Joomla's Users options.
How Do I Set Up The Search Box
Publish a Smart Search module to position-0. It sits at the right of the menu bar. The search position goes to the same place, so use whichever you like.
How Do I Set Up The Social Icons
- Open System and, in the Templates panel, select Site Template Styles.
- Select the name of your template style to open it.
- Select the Community Links tab.
- For each network you use, enter your full profile address and set its Show switch to Yes. The list is X, Facebook, Instagram, Threads, Bluesky, Mastodon, LinkedIn, YouTube, TikTok, Vimeo, Pinterest, Discord and RSS.
- Select Save & Close.
How Do I Set Up The Footer
The demo footer has a Menu module in footer-left and your copyright line, a Custom module, in footer-right. On a Quickstart site, open Footer Text to change the wording. Use footer for anything that should run the full width above them.
How Does It Work On Phones
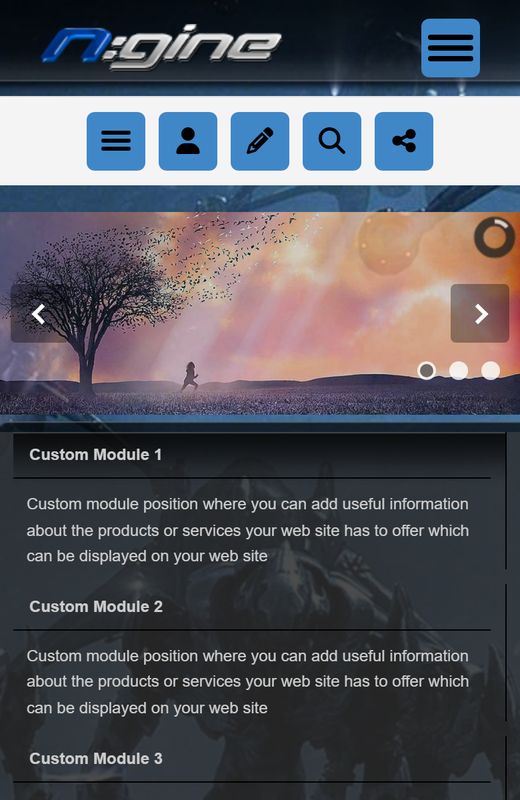
The template adapts without any set-up. The button at the top right opens the main menu. The row under the logo has buttons for a second menu, log in, register, search and your social links, and they use the modules and settings you have already made.
How Do I Add My Own CSS Or Analytics Code
- Open System and, in the Templates panel, select Site Template Styles.
- Select the name of your template style to open it.
Select the Header & Footer Custom Code tab.
- Custom CSS: your own CSS, added after the template's stylesheets so it wins. It is saved in the database, so a template update does not touch it.
- Insert code into template header and Insert code into template footer: code for Google Analytics or similar tools. Paste it where your provider tells you to.
For a larger stylesheet, create the file templates/ngine/css/custom.css. The template loads it if it exists. It is not part of the package, so an update cannot overwrite it.
How Do I Keep It Up To Date
If you installed the package, new releases show up in Joomla under System, in the Update panel, under Extensions. A Quickstart site is not registered for this yet, so install pkg_ngine-6.2.0.zip on it once, as shown above. The changelog lists what changed in each one. Updates and downloads come with an active membership, and the template keeps working after a membership ends.
Back up your site first. Your settings, modules and Custom CSS are saved in the database, so an update does not change them. If you edited the template's own files, those edits are replaced: keep your changes in Custom CSS or css/custom.css instead.
Where To Get Help
Your membership includes support for using and setting up the template.
- Install the Quickstart on a test folder. It gives you an exact copy of the Ngine demo, so you can open any module and see how it is set up.
- Read the knowledge base.
- Log in and open a support ticket.
For help with Joomla itself, use the Joomla documentation and the Joomla forum.
Please read the Terms of Service, which you agree to when you buy the template.
